Category Archives: Reports

Seven Things for August 19, 2015

More stuff:

  • New interactive 3D graphics books at SIGGRAPH 2015: WebGL Insights, GPU Pro 6 (Kindle right now, hardcover in September). Let me know if I missed anything (see full list here, which also includes links to Google Books previews for these new books).
  • Updated book: 7th edition of the OpenGL SuperBible. I would guess that, with Vulkan coming down the pike, and Apple going with Metal and no longer developing OpenGL (it’s back in 2010 at 4.1 in Mavericks), this will be the final edition. Future students having to learn Vulkan or DirectX 12, well, that won’t be much fun at all…
  • I mentioned yesterday how you can download the SIGGRAPH 2015 Proceedings for free this week. There’s more, in theory. Some of the links there have nothing as of right now. The Posters are worth a skim, especially since I didn’t see them at SIGGRAPH. I also liked the Studio PDF. It starts with a bunch of single-page talks that are fun to snack on, followed by a few random slidesets. Emerging Tech also has longer descriptions than on the ETech page (which has more pics and videos, however). If you gotta catch ’em all, there’s also a PDF for Panels.
  • There have been many news articles recently about not viewing screens at bedtime. Right, sure. Michael Herf (former CTO at Picasa) is the president at f.lux, one company that makes screens vary in overall spectra during the day to ameliorate the problem. He pointed me at a useful-to-researchers bit: their fluxometer site, with spectra for many different displays, all downloadable.
  • Oh, and related, a tip from Michael: Pantone stickers with differing colors (using metameric failure) under different temperature lights, so you can ensure you’re showing work under consistent lighting conditions.
  • I was impressed by HALIDE, an MIT licensed open source project for writing high performance image processing code (including GPU versions) from scratch. Most impressive is their case study for local Laplacian filters (p. 28), showing great performance with considerably less code and time coding vs. Adobe Photoshop’s efforts. Google and others use it extensively (p. 32).
  • Path tracing is all the rage for the film industry; the Arnold renderer started it (AFAIK) and others have followed suit. Here’s an entertaining path trace of interior lighting for a Minecraft scene using the free Chunky path tracer. SPP is samples per pixel:

Chunk progressive render

New CRC Books

Well, newish books, from the past year. By the way, I’ve also updated our books list with all relevant new graphics books I could find. Let me know if I missed any.

This post reviews four books from CRC Press in the past year. Why CRC Press? Because they offered to send me books for review and I asked for these. I’ve listed the four books reviewed in my own order of preference, best first. Writing a book is a ton of work; I admire anyone who takes it on. I honestly dread writing a few of these reviews. Still, at the risk of being disliked, I feel obligated to give my impressions, since I was sent copies specifically for review, and I should not break that trust. These are my opinions, not my cat’s, and they could well differ from yours. Our own book would get four out of five stars by my reckoning, and lower as it ages. I’m a tough critic.

I’m also an unpaid one: I spent a few hours with each book, but certainly did not read each cover to cover (though I hope to find the time to do so with Game Engine Architecture for topics I know nothing about). So, beyond a general skim, I decided to choose a few graphics-related operations in advance and see how well each book covered them. The topics:

  • Antialiasing, since it’s important to modern applications
  • Phong shading vs. lighting, since they’re different
  • Clip coordinates, which is what vertex shaders produce

Continue reading

Limits of Triangles

You’re mapping a latitude-longitude texture on to a sphere. Pretty straightforward, right? Compute the UV coordinates at the vertices and let the rasterizer do the work. The only problem is that you can’t get exactly the right answer at the poles. Part of the problem is that getting a good U value at each pole is problematic: U is essentially undefined. It’s like asking what longitude you’re at when you’re sitting at the north pole – you can take your pick, since none is correct.

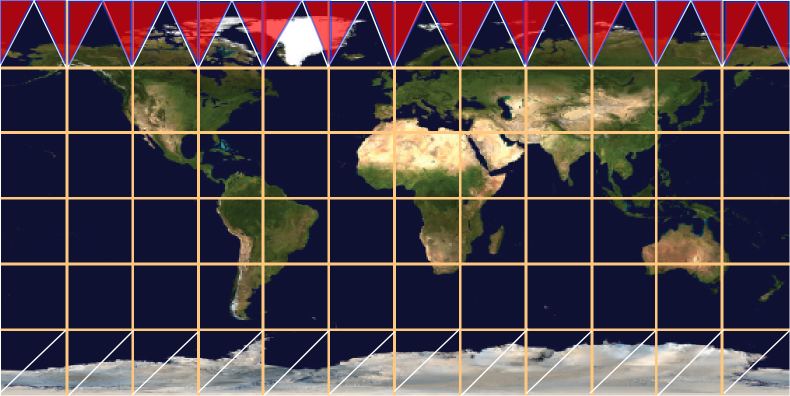
One way around this is to look at the other vertices in the triangle (i.e., those not at the pole) and average the U values they have. This gives a tessellation at the north pole something like this:

marked_monkey

What’s interesting about this tessellation is that it leaves out half of the horizontal strip of texture near the pole. The sawtooth of triangles will display one half of the texture in this strip, but will not display the triangles covered in red. Even if you form these triangles, adding them to the mesh, they won’t appear. Recall that all points along the upper edge of the texture are located at the same position in world space, the north pole of the model itself. So any red triangles added will collapse; they’ll have zero area, as their two points along the top edge are co-located.

I show a different tessellation along the bottom strip of the texture, a more traditional way to generate the UV coordinates and triangles. Again, all the triangles with edges along the bottom of the texture will collapse to zero area, and half of the texture in the strip will not be rendered. The triangles that are rendered here are somewhat arbitrary – at least the triangles along the top edge have a symmetry to them.

There are two ways I know to improve the rendering. One is to tessellate more: the more lines of latitude you make, the smaller the problem areas at the poles become. The artifacts are still there, but contained in a smaller area. The other, ultimate solution is that you could compute the UV location per pixel, not per vertex.

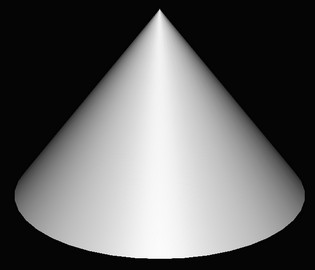
That works for texturing, if you can afford to fold the spherical mapping into the pixel shader. However, this problem isn’t limited to spheres, and isn’t limited to textures. Another example is the cone and having a normal per vertex. This is a common object, but is surprisingly messy. For a cone pointing up you typically make a separate vertex for each triangle meeting at the tip, with a separate normal. This is similar to the uppermost strip for the sphere mapping above: the normal points out in a direction somewhere between the two bottom normals for the triangle in the cone.

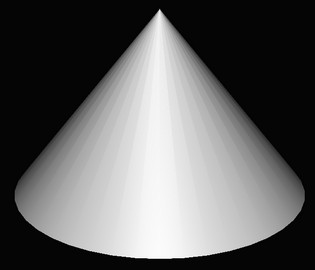
However, you have the same sort of interpolation problem! Here’s a cone with a tessellation of 40 vertices around the top and bottom edges:

cone_normals1

From triangle to triangle along the side of the cone, you have normals smoothly interpolating along the bottom of the cone. Moving across a vertical edge near the tip, you have sudden shifts in the normal’s direction as you go from one normal to another. Each zero-area triangle that is formed by two points touching the pole is what “causes” the discontinuity in shading when crossing an edge.

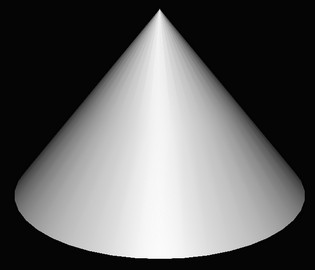
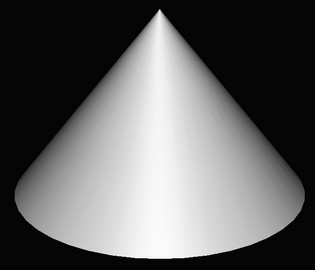
If you start to add “lines of latitude”, to vertically tessellate the surface, things improve. Here are cones with two strips of triangles, three strips, then ten strips:

cone_normals2 cone_normals3 cone_normals10

It’s interesting to me that the first image, two strips of triangles, doesn’t fully improve the bottom part of the cone. Even though there are no zero-area triangles and so the normal is the same for each vertex in this area, the normals change at different rates across the surface and our eyes pick this up as Mach banding of a sort. Three strips gives three bands of poor interpolation, and so on. With ten bands things look good, at least for this lighting and amount of specularity. Increasing the tessellation gets us closer and closer to the ideal per-pixel computation.

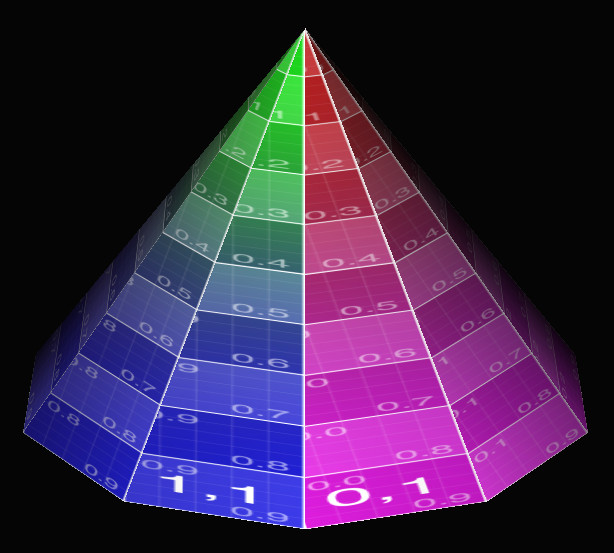
Here are some images of the cone mapping to show the discontinuities. The first gives a low tessellation: 10 vertices around, no tessellation vertically

cone_lo_res

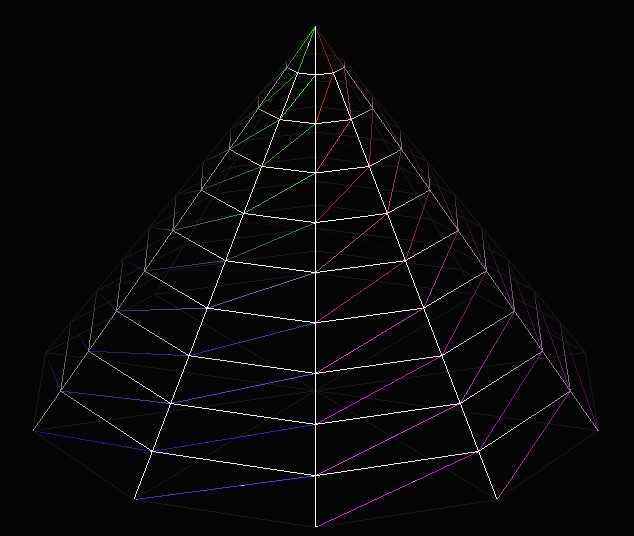
Half of the texture is missing on each face of the cone. If you increase the vertical tessellation, like so:

cone_wireframe

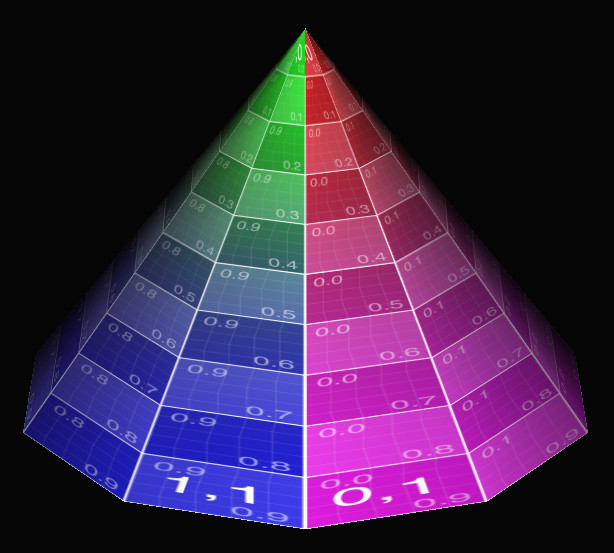
You get this:

cone_hi_lat

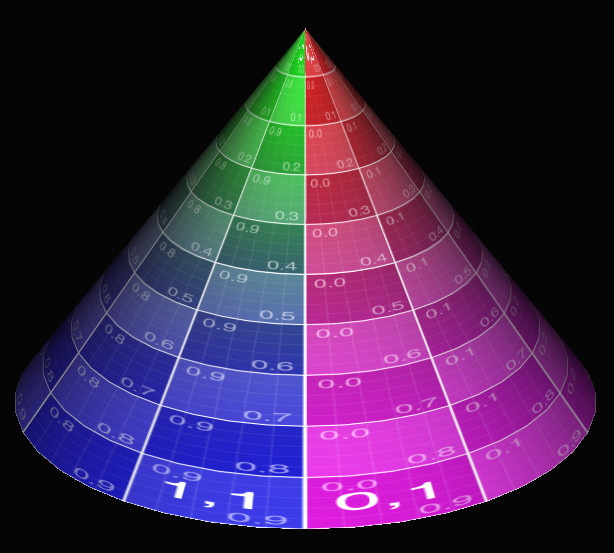
It’s better, but there’s still a dropout at the tip (it should say “1,0 | 0,0”), plus you can see the lines on the surface are not straight – the vertical lines on the faces wobble. Each quadrilateral is a trapezoid, so using two triangles for this mapping doesn’t match it all that well.

If you increase the tessellation in both directions, you get closer still to a per pixel mapping, the correct answer:

cone_hi_both

This tessellation is 40 points around, 10 points from bottom to top. The very tip still has half its information missing, but otherwise things look reasonable. Cranking the resolution up to 50 around and 50 from bottom to top mostly cleans up the tip (ignoring the lack of high-quality texture sampling):

cone_super_high_tip

This is an old phenomenon, but still a surprising one, at least to me. We’re used to tessellating any higher-order surface into triangles for rasterization or ray tracing. Usually I increase tessellation just to capture geometric details, not normal or texture interpolation. You would think it would be possible to easily set up triangles in such a way that relatively simple mappings would not have problems such as these. You basically want something more like a quadrilateral mapping, where the left edge of the triangle is using, say, U = 0.20 along its edge and the right edge uses U = 0.30. The problem is that the point at the tip has a U of say 0.25, so both edges interpolate from there.

I should note that this problem is solvable by messing with the mappings themselves. For example, you could instead use a different texture and a cube map projected onto a sphere to solve that case, which would also decrease distortion and so require less texture resolution overall.

Woo, Pearce, and Ouellette have a lovely old paper about this and other common rendering bugs and their solutions. They reference a paper by Nelson Max from 1989, “Smooth Appearance for Polygonal Surfaces” for using C1 continuity. This doesn’t seem easy to do on the GPU without a lot of extra data. Has anyone tried solving this general problem, of treating two triangles as a quadrilateral mapping? I don’t really need to solve this problem right now, I just think it’s interesting, something that’s doable in a pixel shader in some way. I’m hoping someone’s created an elegant solution.

Update: and I got a solution of sorts. Thanks to Tom Forsyth for getting the ball rolling on Twitter. Nathan Reed’s post on this topic talks about setup, Iñigo Quílez talks about performing bilinear interpolation in the shader and gives a ShaderToy demo. However, these seem a bit apples and oranges: Nathan is working with projective interpolation, Inigo is working with equi-spaced bilinear interpolation – they’re different. See page 14 on of Heckbert’s master’s thesis, for example.

Another update: Jules Bloomenthal notes how his barycentric quad rasterization work fixes cones.

Why use WebGL for Graphics Research?

guest post by Patrick Cozzi, @pjcozzi.

This isn’t as crazy as it sounds: WebGL has a chance to become the graphics API of choice for real-time graphics research. Here’s why I think so.

An interactive demo is better than a video.

WebGL allows us to embed demos in a website, like the demo for The Compact YCoCg Frame Buffer by Pavlos Mavridis and Georgios Papaioannou. A demo gives readers a better understanding than a video alone, allows them to reproduce performance results on their hardware, and enables them to experiment with debug views like the demo for WebGL Deferred Shading by Sijie Tian, Yuqin Shao, and me. This is, of course, true for a demo written with any graphics API, but WebGL makes the barrier-to-entry very low; it runs almost everywhere (iOS is still holding back the floodgates) and only requires clicking on a link. Readers and reviewers are much more likely to check it out.

WebGL runs on desktop and mobile.

Android devices now have pretty good support for WebGL. This allows us to write the majority of our demo once and get performance numbers for both desktop and mobile. This is especially useful for algorithms that will have different performance implications due to differences in GPU architectures, e.g., early-z vs. tile-based, or network bandwidth, e.g., streaming massive models.

WebGL is starting to expose modern GPU features.

WebGL is based on OpenGL ES 2.0 so it doesn’t expose features like query timers, compute shaders, uniform buffers, etc. However, with some WebGL 2 (based on ES 3.0) features being exposed as extensions, we are getting access to more GPU features like instancing and multiple render targets. Given that OpenGL ES 3.1 will be released this year with compute shaders, atomics, and image load/store, we can expect WebGL to follow. This will allow compute-shader-based research in WebGL, an area where I expect we’ll continue to see innovation. In addition, with NVIDIA Tegra K1, we see OpenGL 4.4 support on mobile, which could ultimately mean more features exposed by WebGL to keep pace with mobile.

Some graphics research areas, such as animation, don’t always need access to the latest GPU features and instead just need a way to visualization their results. Even many of the latest JCGT papers on rendering can be implemented with WebGL and the extensions it exposes today (e.g., “Weighted Blended Order-Independent Transparency“). On the other hand, some research will explore the latest GPU features or use features only available to languages with pointers, for example, using persistent-mapped buffers in Approaching Zero Driver Overhead by Cass Everitt, Graham Sellers, John McDonald, and Tim Foley.

WebGL is faster to develop with.

Coming from C++, JavaScript takes some getting use to (see An Introduction to JavaScript for Sophisticated Programmers by Morgan McGuire), but it has its benefits: lighting-fast iteration times, lots of open-source third-party libraries, some nice language features such as functions as first-class objects and JSON serialization, and some decent tools. Most people will be more productive in JavaScript than in C++ once up to speed.

JavaScript is not as fast as C++, which is a concern when we are comparing a CPU-bound algorithm to previous work in C++. However, for GPU-bound work, JavaScript and C++ are very similar.

Try it.

Check out the WebGL Report to see what extensions your browser supports. If it meets the needs for your next research project, give it a try!

512 and counting

I noticed I reached a milestone number of postings today, 512 answers posted to the online Intro to 3D Graphics course. Admittedly, some are replies to questions such as “how is your voice so dull?” However, most of the questions are ones that I can chew into. For example, I enjoyed answering this one today, about how diffuse surfaces work. I then start to ramble on about area light sources and how they work, which I think is a really worthwhile way to think about radiance and what’s happening at a pixel. I also like this recent one, about z-fighting, as I talk about the giant headache (and a common solution) that occurs in ray tracing when two transparent materials touch each other.

So the takeaway is that if you ever want to ask me a question and I’m not replying to email, act like you’re a student, find a relevant lesson, and post a question there. Honestly, I’m thoroughly enjoying answering questions on these forums; I get to help people, and for the most part the questions are ones I can actually answer, which is always a nice feeling. Sometimes others will give even better answers and I get to learn something. So go ahead, find some dumb answer of mine and give a better one.

By the way, I finally annotated the syllabus for the class. Now it’s possible to cherry-pick lessons; in particularly, I mark all lessons that are specifically about three.js syntax and methodology if you already know graphics.

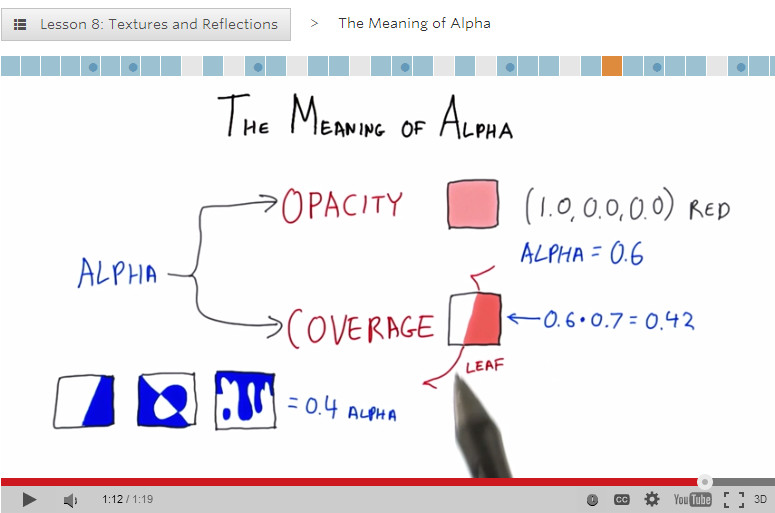
alpha

Good points, some bad points

The recently and sadly departed Game Developer magazine had a great post-mortem article format of “5 things that went right/went wrong” with some videogame, by its creators. I thought I’d try one myself for the MOOC “Interactive 3D Graphics” that I helped develop. I promise my next posts will not be about MOOCs, really. The payoff, not to be missed, is the demo at the end – click that picture below if you want to skip the words part and want dessert now.

Good Points

Three.js: This layer on top of WebGL meant I could initially hide details critical to WebGL but overwhelming for beginners, such as shader programming. The massive number of additional resources and libraries available were a huge help: there’s a keyframing library, a collision detection library, a post-processing library, on and on. Documentation: often lacking; stability: sketchy – interfaces change from release to release; usefulness: incredible – it saved me tons of time, and the course wouldn’t have gone a third as far as it did if I used just vanilla WebGL.

Web Stuff: I didn’t have to handle any of the web programming, and I’m still astounded at how much was possible, thanks to Gundega Dekena (the assistant instructor) and the rest of the Udacity web programmers. Being able to show a video, then let a student try out a demo, then ask him or her a question, then provide a programming exercise, all in a near-seamless flow, is stunning to me. Going into this course we didn’t know this system was going to work at all; a year later WebGL is now more stable and accepted, e.g., Internet Explorer is now finally going to support it. The bits that seem peripheral to the course matter a lot: Udacity’s forum is nicely integrated, with students’ postings about particular lessons directly linked from those pages. It’s lovely having a website that lets students download all videos (YouTube is slow or banned in various places), scripts, and code used in the course.

Course Format: Video has some advantages over text. The simple ability to point at things in a figure while talking through them is a huge benefit. Letting the student try out some graphics algorithm and get a sense of what it does is fantastic. Once he or she has some intuition as to what’s going on, we can then dig into details. I wanted to get stuff students could sensibly control (triangles, materials) on the screen early on.  Most graphics books and courses focus on dreary transforms and matrices early on. I was able to put off these “eat your green beans” lessons until nearly halfway through the course, as three.js gave enough support that the small bits of code relating to lights and cameras could be ignored for a time. Before transforms, students learned a bit about materials, a topic I think is more immediately engaging.

Reviewers and Contributors: I had lots of help from Autodesk co-workers, of course. Outside of that, every person I asked “can I show your cool demo in a lesson?” said yes – I love the graphics community. Most critical of all, I had great reviewers who caught a bunch of problems and contributed some excellent ideas and revisions. Particular kudos to Gundega Dekena, Mauricio Vives, Patrick Cozzi, and at the end, Branislav Ulicny (AlteredQualia). I owe them each like a house or something.

Creative Control: I’m happy with how most of the lessons came out. I overreached with a few lessons (“Frames” comes to mind), and a few lines I delivered in some videos make me groan when I hear them. However, the content itself of many of the recordings are the best I’ve ever explained some topics, definite improvements on Real-Time Rendering. That book is good, but is not meant as an introductory text. I think of this course as the prequel to that volume, sort of like the Star Wars prequels, only good. The scripts for all the lessons add up to about 850 full-sized sheets of paper, about 145,000 words. It’s a book, and I’m happy with it overall.

Some Bad Points

Automatic Grading: A huge boon on one level, since grading individual projects would have been a never-ending treadmill for us humans. Quick stats: the course has well over 30,000 enrollments, with about 1500 people active in any given week, 71% outside the U.S. But, it meant that some of the fun of computer graphics – making cool projects such as Rube Goldberg devices or little games or you name it – couldn’t really be part of the core course. We made up for this to some extent by creating contests for students. Some entries from the first contest are quite nice. Some from the second are just plain cool. But, the contests are over now, with no new ones on the horizon. My consolation is that anyone who is self-motivated enough to work their way through this course is probably going to go off and do interesting things anyway, not just say, “Computer graphics, check, now I know that – on to basket weaving” (though I guess that’s fine, too).

Difficulty in Debugging: The cool thing about JavaScript is that you can debug simple programs in the browser, e.g. in Chrome just hit F12. The bad news is that this debugger doesn’t work well with the in-browser code development system Udacity made. The workarounds are to perform JSHint on any code in the browser, which catches simple typos, and to provide the course code on Github; developing the code locally on your machine means you can use the debugger. Still, a fully in-browser solution with debugging available would have been better.

Videos: Some people like Salman Khan can give a lecture and draw at the same time, in a single take. That’s not my skill set, and thankfully the video editors did a lot to clean up my recordings and fix mistakes as found. However, a few bugs still slipped through or were difficult to correct without me re-recording the lesson. We point these out in the Instructor Notes, but re-recording is a lot of time and effort on all our parts, and involves cross-country travel for me. Text or code is easy to fix and rearrange, videos are not. I expect this limitation is something our kids will someday laugh or scratch their heads about. As far as the format itself goes, it seems like a pain to me to watch a video and later scrub through it to find some code bit needed in an upcoming exercise. I think it’s important to have the PDF scripts of the videos available to students, though I suspect most students don’t use them or even know about them. I believe students cope by having two browser windows open side-by-side, one with the paused video, one with the exercise they’re working on.

Out of Time: Towards the end of the course some of the lessons become (relatively) long lectures and are less interactive; I’m looking at you, Unit 8. This happened mostly because I was running out of time – it was quicker for me to just talk than to think up interesting questions or program up worthwhile exercises. Also, the nature of the material was more general, less feature-oriented, which made for more traditional lectures that were tougher to simply quiz about. Still, having a deadline focused my efforts (even if I did miss the deadline by a month or so), and it’s good there was a deadline, otherwise I’d endlessly fiddle with improving bits of the course. I think my presentation style improved overall as the lessons go on; the flip side is that the earlier lessons are rougher in some ways, which may have put students off. Looking back on the first unit, I see a bunch of things I’d love to redo. I’d make more in-browser demos, for starters – at the beginning I didn’t realize that was even possible.

Hollow Halls: MOOCs can be divided into two types by how they’re offered. One approach is self-paced, such as this MOOC. The other has a limited duration, often mirroring a real-world class’s progression. The self-paced approach has a bunch of obvious advantages for students: no waiting to start, take it at your own speed, skip over lessons you don’t care about, etc. The advantages of a launched course are community and a deadline. On the forum you’re all at the same lesson and so study groups form and discussions take place. Community and a fixed pace can help motivate students to stick it through until the end (though of course can lose other students entirely, who can then never finish). The other downside of self-pacing is that, for the instructor(s), the course is always-on, there’s no break! I’m pretty responsible and like answering forum posts, but it’s about a half hour out of my day, every day, and the time piles up if I’m on vacation for a week. Looking this morning, there are nine forum posts to check out… gotta go!

But it all works out, I’m a little freaked out. For some reason that song went through my head a lot while recording, and gave a title to this post.

Below is one of the contest entries for the course. Click on the image to run the demo; more about the project on the Udacity forums. You may need to refresh to get things in sync. A more reliable solution is to pick another song, which almost always causes syncing to occur. See other winners here, and the chess game is also one I enjoyed.
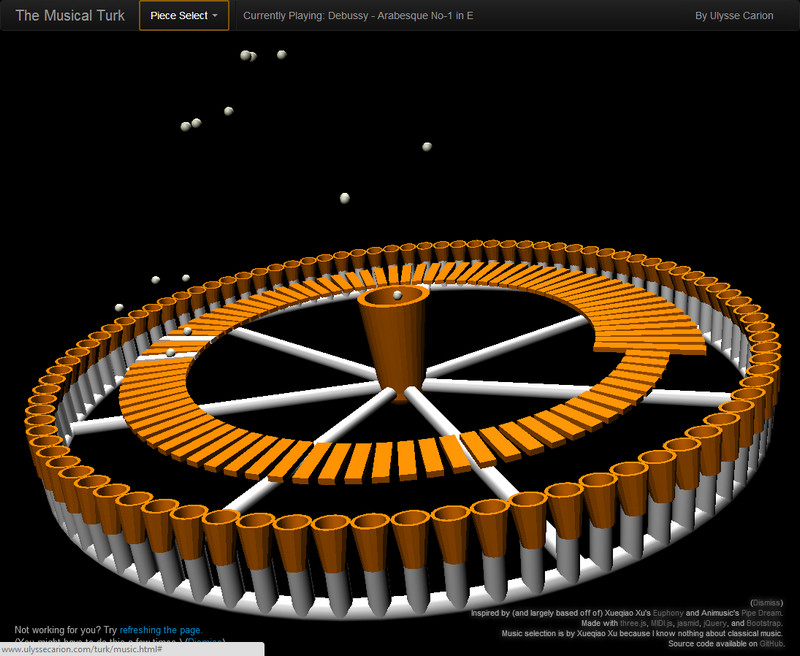
Musical Turk


Yup, Zup?

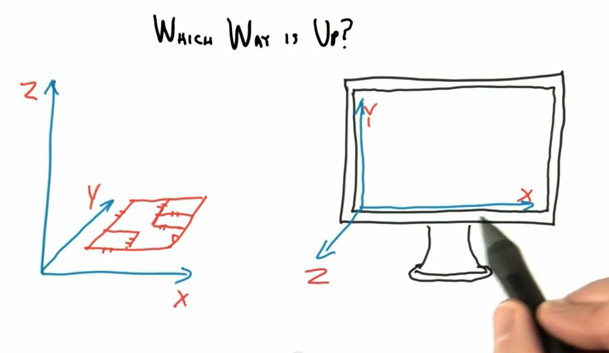
In other words, is Y up, or is Z up? It’s a loaded question. My little lesson (YouTube) from the course is here, in case you don’t know the issue. What’s more entertaining, and the point of this post, are the answers I got back from the people I asked. I’ve asked this question before in this blog.

Speaking of cameras, is there nothing that three.js cannot do? Check out this incredible piece of wonderfulness and have a webcam ready. Or go right to the demo, and then the other demo. It’s one of those “of course we should be able to do that” kinds of things, but to have it just one mouse click away (assuming you’re set up to run WebGL; if not, go here).


Setting up a Windows Server for WebGL

While it’s fresh in my mind, I’m going to write down the steps for setting up a simple server on your local machine to help run WebGL. 99% of readers won’t care, so begone! Or actually, see the power of WebGL by trying out a zillion demos on the three.js page (you’ll need to use Chrome or Firefox or properly-prepared Safari – try this page if you have problems getting going, it points to the information you’ll need). Whoever’s left might be on Mac or Linux – you could use LAMP on Mac, Apache on Linux, or whatever else you like. Update: I found some further instructions here for other platforms and other server setup methods.

Now, for whoever’s really left…

Why would you want to set up a server for webpages? Well, you need this only if:

  • You want to develop WebGL applications.
  • You plan on loading textures or model files.
  • You don’t want to set up some tricksy settings that open up security holes in your browser.
  • You don’t have a server running on your machine and are as clueless as I am about setting such things up.

Background: if you want to load a texture image to use in a WebGL program, then you need the texture to be on the same machine (barring cleverness) and to have both your web page and the texture somewhere in the “documents” area of the same server. This is needed for security reasons.

On Firefox you can get around this security feature by typing “about:config” in the URL. You’ll get a security warning; say “OK”. Now search on “strict_” and you’ll find “security.fileuri.strict_origin_policy”. Double-click to set this to “false”.

On Chrome you can do it two ways: each time on the command line, or once with the program icon itself; I recommend the latter.

First method, command line: start a command window (“Start” button, type “cmd”), go to the directory where chrome.exe is located, (e.g., “cd C:\Users\hainese\AppData\Local\Google\Chrome\Application”) then type:

chrome.exe --allow-file-access-from-files

to start up Chrome. Key tip: make sure to close down all copies of Chrome before restarting it this way, otherwise it doesn’t work (thanks to Patrick Cozzi for this “obvious in retrospect” tip).

Second method: made a shortcut to Chrome, right-click on it and select Properties. Then, add

    --allow-file-access-from-files

to the end of Target, which will be something like “C:\Users\hainese\AppData\Local\Google\Chrome\Application\chrome.exe”.

Server Creation Instructions

These previous methods are nice, in that you can then just double-click on a WebGL html page and it’ll run. Downside is you’re opening up a security hole. If you’d rather just set up a local server and be safer (AFAIK), it’s pretty easy and less scary that I thought. Lighttpd (pronounced “lighty”, go figure) is a lightweight server. There are others, but this one worked for me and was trivial to set up for Windows (vs. Microsoft’s involved “install, open, create” steps for its IIS server for Windows, which I’m told is “easy” but looked more like a treasure hunt).

Edit: I’ve been told the wamp server is also nice.

Here’s the whole deal:

1.  Download from WLMP Project – the link to download the .exe is near the bottom (Google’s Developer Network hosts one, so it’s safe), here’s the link.
2.  Run the .exe and install. Use the defaults. You may get a “reinstall with recommended settings” warning at the end; I did.
3.  Edit the text file “C:\Program Files (x86)\LightTPD\conf\lighttpd.conf” (or wherever you put it) and comment out the line (by adding a “#” in front of it):

server.document-root        = server_root + "/htdocs"

and add this line after:

server.document-root        = "C:/Users/<yourname>/Documents/WebGLStuff"

substituting “<yourname>” and “WebGLStuff” with whatever user directory you want. Important: note that the directory path has “/”, not “\”. It might work both ways, but I know “/” works. Everything in this directory and below will be in view of the server. Save the file. Key tip: don’t make this directory in some semi-protected area of your computer like “C:/Program Files (x86)”, make it in your user directory area.

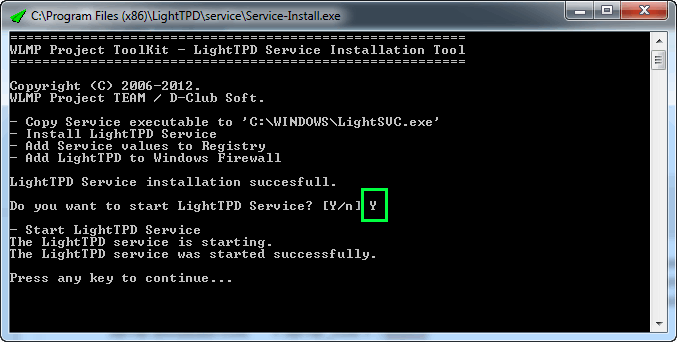
4.  Go to “C:\Program Files (x86)\LightTPD\service” and run Service-Install.exe, then answer “Y”:

You may get a “reinstall with recommended settings” here, too – just agree and do it again.

You have a server running on your machine! You can see it running by ctrl-alt-delete and in the Task Manager you’ll see it under “Services” as “lighttpd”.

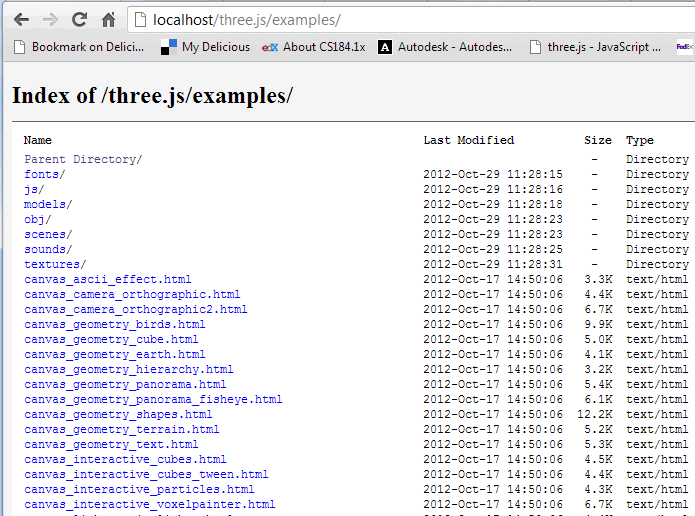
Now you can put any and all WebGL code, images, etc. in any location or subdirectory below “C:/Users/<yourname>/Documents/WebGLStuff” and be able to run it. You’ll run by actually typing “localhost” and then clicking on down into the directory you want. That’s important: you can’t just double-click on an HTML page in a directory but have to use the path “localhost/” as the prefix to the URL.

For example, if you put the code for three.js (which is entirely awesome, in the “awesome” sense of the word, not in the “pancakes? awesome!” sense of the word) in a directory, you’ll see something like this as you find it in your tree:

Click on an HTML file and you run it. For example, if I clicked on the last file shown, it would run and the URL shown would be “http://localhost/three.js/examples/canvas_interactive_voxelpainter.html”.

This all sounds like a PITA, but the cool thing about it all is that WebGL pages you make let you put interactive 3D demos and whatnot on the web without requiring much by the viewer (just any browser other than Internet Explorer, pretty much) – no program download, no plugin, no permissions requirements, nothing. I plan on using this functionality heavily in the web course I’m designing.

There’s lots more you can do with the lighttpd .conf configuration files, but the change detailed above is the minimal thing to do. If you ever later change your .conf configure file options, first run Service-Remove.exe in “C:\Program Files (x86)\LightTPD\service”, make your changes, then run Service-Install.exe again.

(Thanks to Diego Hernando Cantor Rivera with his help in getting me past some roadblocks. You’d be amazed at how many ways you can mess up steps 3 & 4.)